
Vim plugins with vim-plug and basic customization of vim/neovim
If you are unfamiliar with vim, it’s controls and how to use it, type
vimtutorin your terminal to get an interactive tutorial
Introduction
Probably one of the weirder choices I made in terms of changing how I use computers recently has been using tiling window managers and vim, which while I had already been experimenting with them, taking an intro to Linux class last quarter has helped spur my interest in these alongside getting me some experience in bash scripting. Towards the end of that class I started looking at Rust and then towards Neovim, followed by wanting to make Neovim a bit more usable. Join me down this rabbit hole that is vim plugins while we talk about how to install and use them.

Today I’m gonna go through what I added and how to install and configure them as well as touching on some config file setup. The end result is going to be something like you see above which includes a file browser panel, autocomplete features as well as enabling some decent settings for code folding. Just to clarify this is done inside a virtual machine running InstantOS and using Cool-Retro-Term which I’ve been trying out recently although I initially did this under Manjaroi3 these steps are fairly universal. That said you may find this easier and safer to do inside a VM of your own, we’ll have to talk about that at some point but some googling will help you get started.
To follow along you really only need a system that has Vim/Neovim installed, technically you can do this even on windows in Powershell however the folder locations are going to be very different. The terminal emulator and tiling window manager I’m showing here are not requirements.
MAKE SURE YOU RUN :checkhealth AFTER INSTALLING AND SOLVE ANY ISSUES REGARD node.js
the check health screen will have good info on how to solve those requirements
Why do I use Neovim?
So far as I know the big advantage to Neovim over vim is that it allows you to use LUA scripting on top of Vim script for any config or script you want to use for automation. This is mainly useful for those who already know LUA since they won’t have top learn a new scripting language used only by Vim. My switch to it came (like many things) mostly on a whim of curiosity although I have found it useful at times to have both Vim and Neovim installed when trouble shooting since standard Vim can remain pure vanilla. Really the decision is up to you as most (but not all) plugins will work on both Vim and Neovim.
What is Vim-plug and why use it?
First things first we should get a plugin manager.
This is generally the recommended method for installing and managing vim plugins since it reduces the risk of having to rebuild your plugin stack should you need to remove a plugin later. Previously plugins were (and still are technically) just a bunch of scripts that vim will load automatically from certain folders, meaning installation was simply done by extracting and dropping files into the ~/.vim directory. unfortunately this meant that if you had to remove a plugin later you would have to remove exact files that might not all be clearly named, lumped together in one big mess.
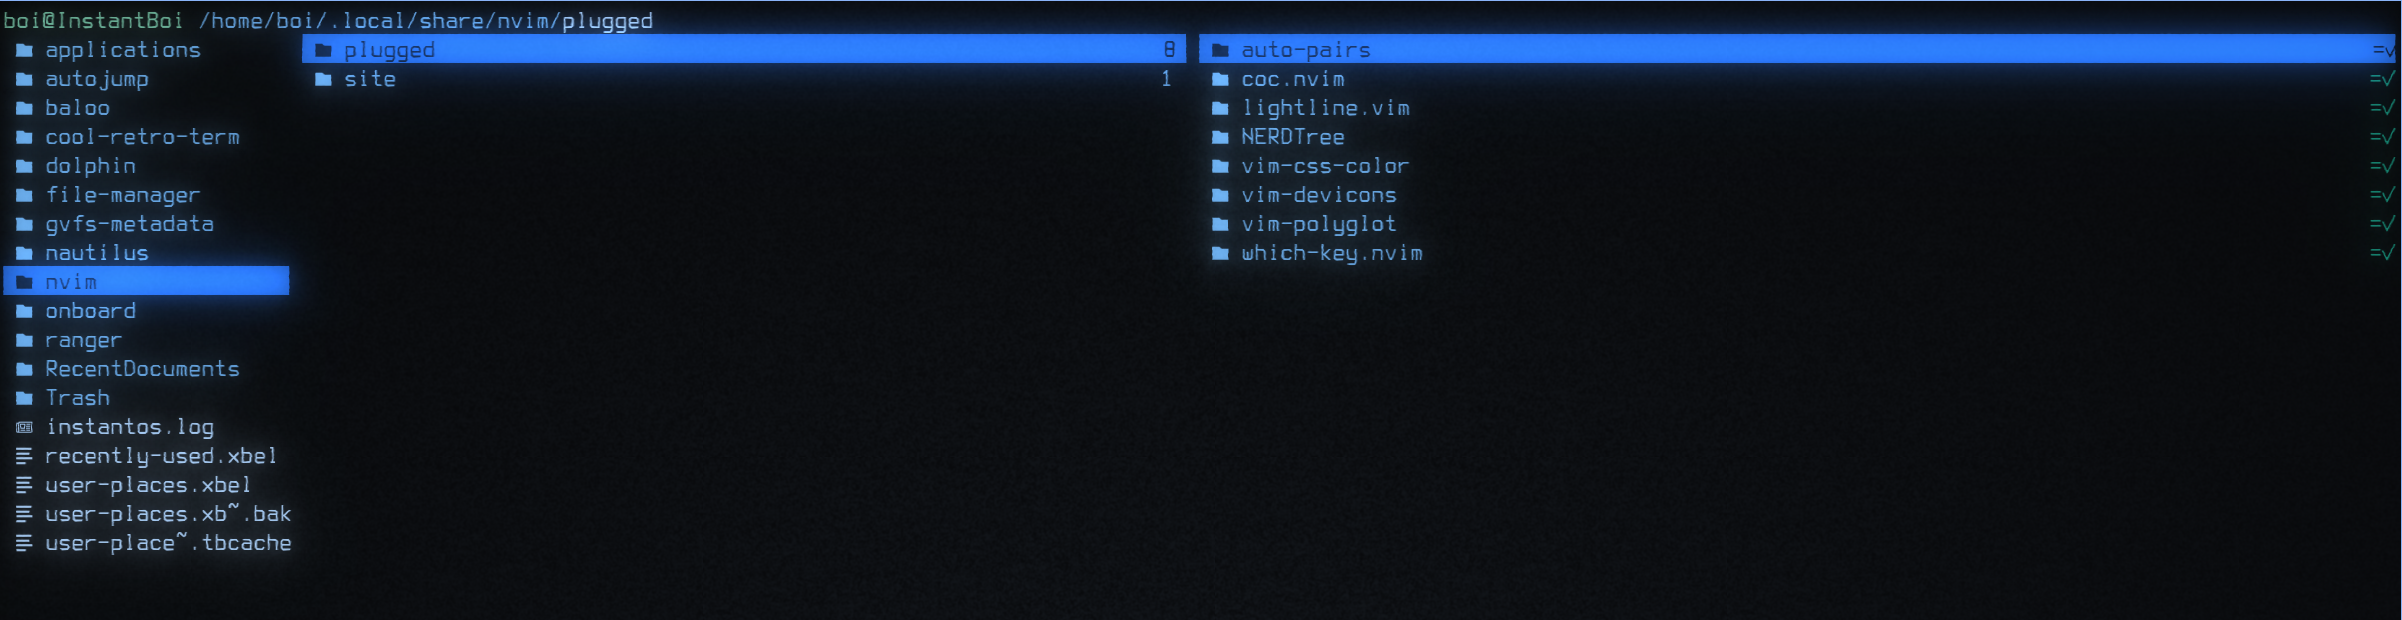
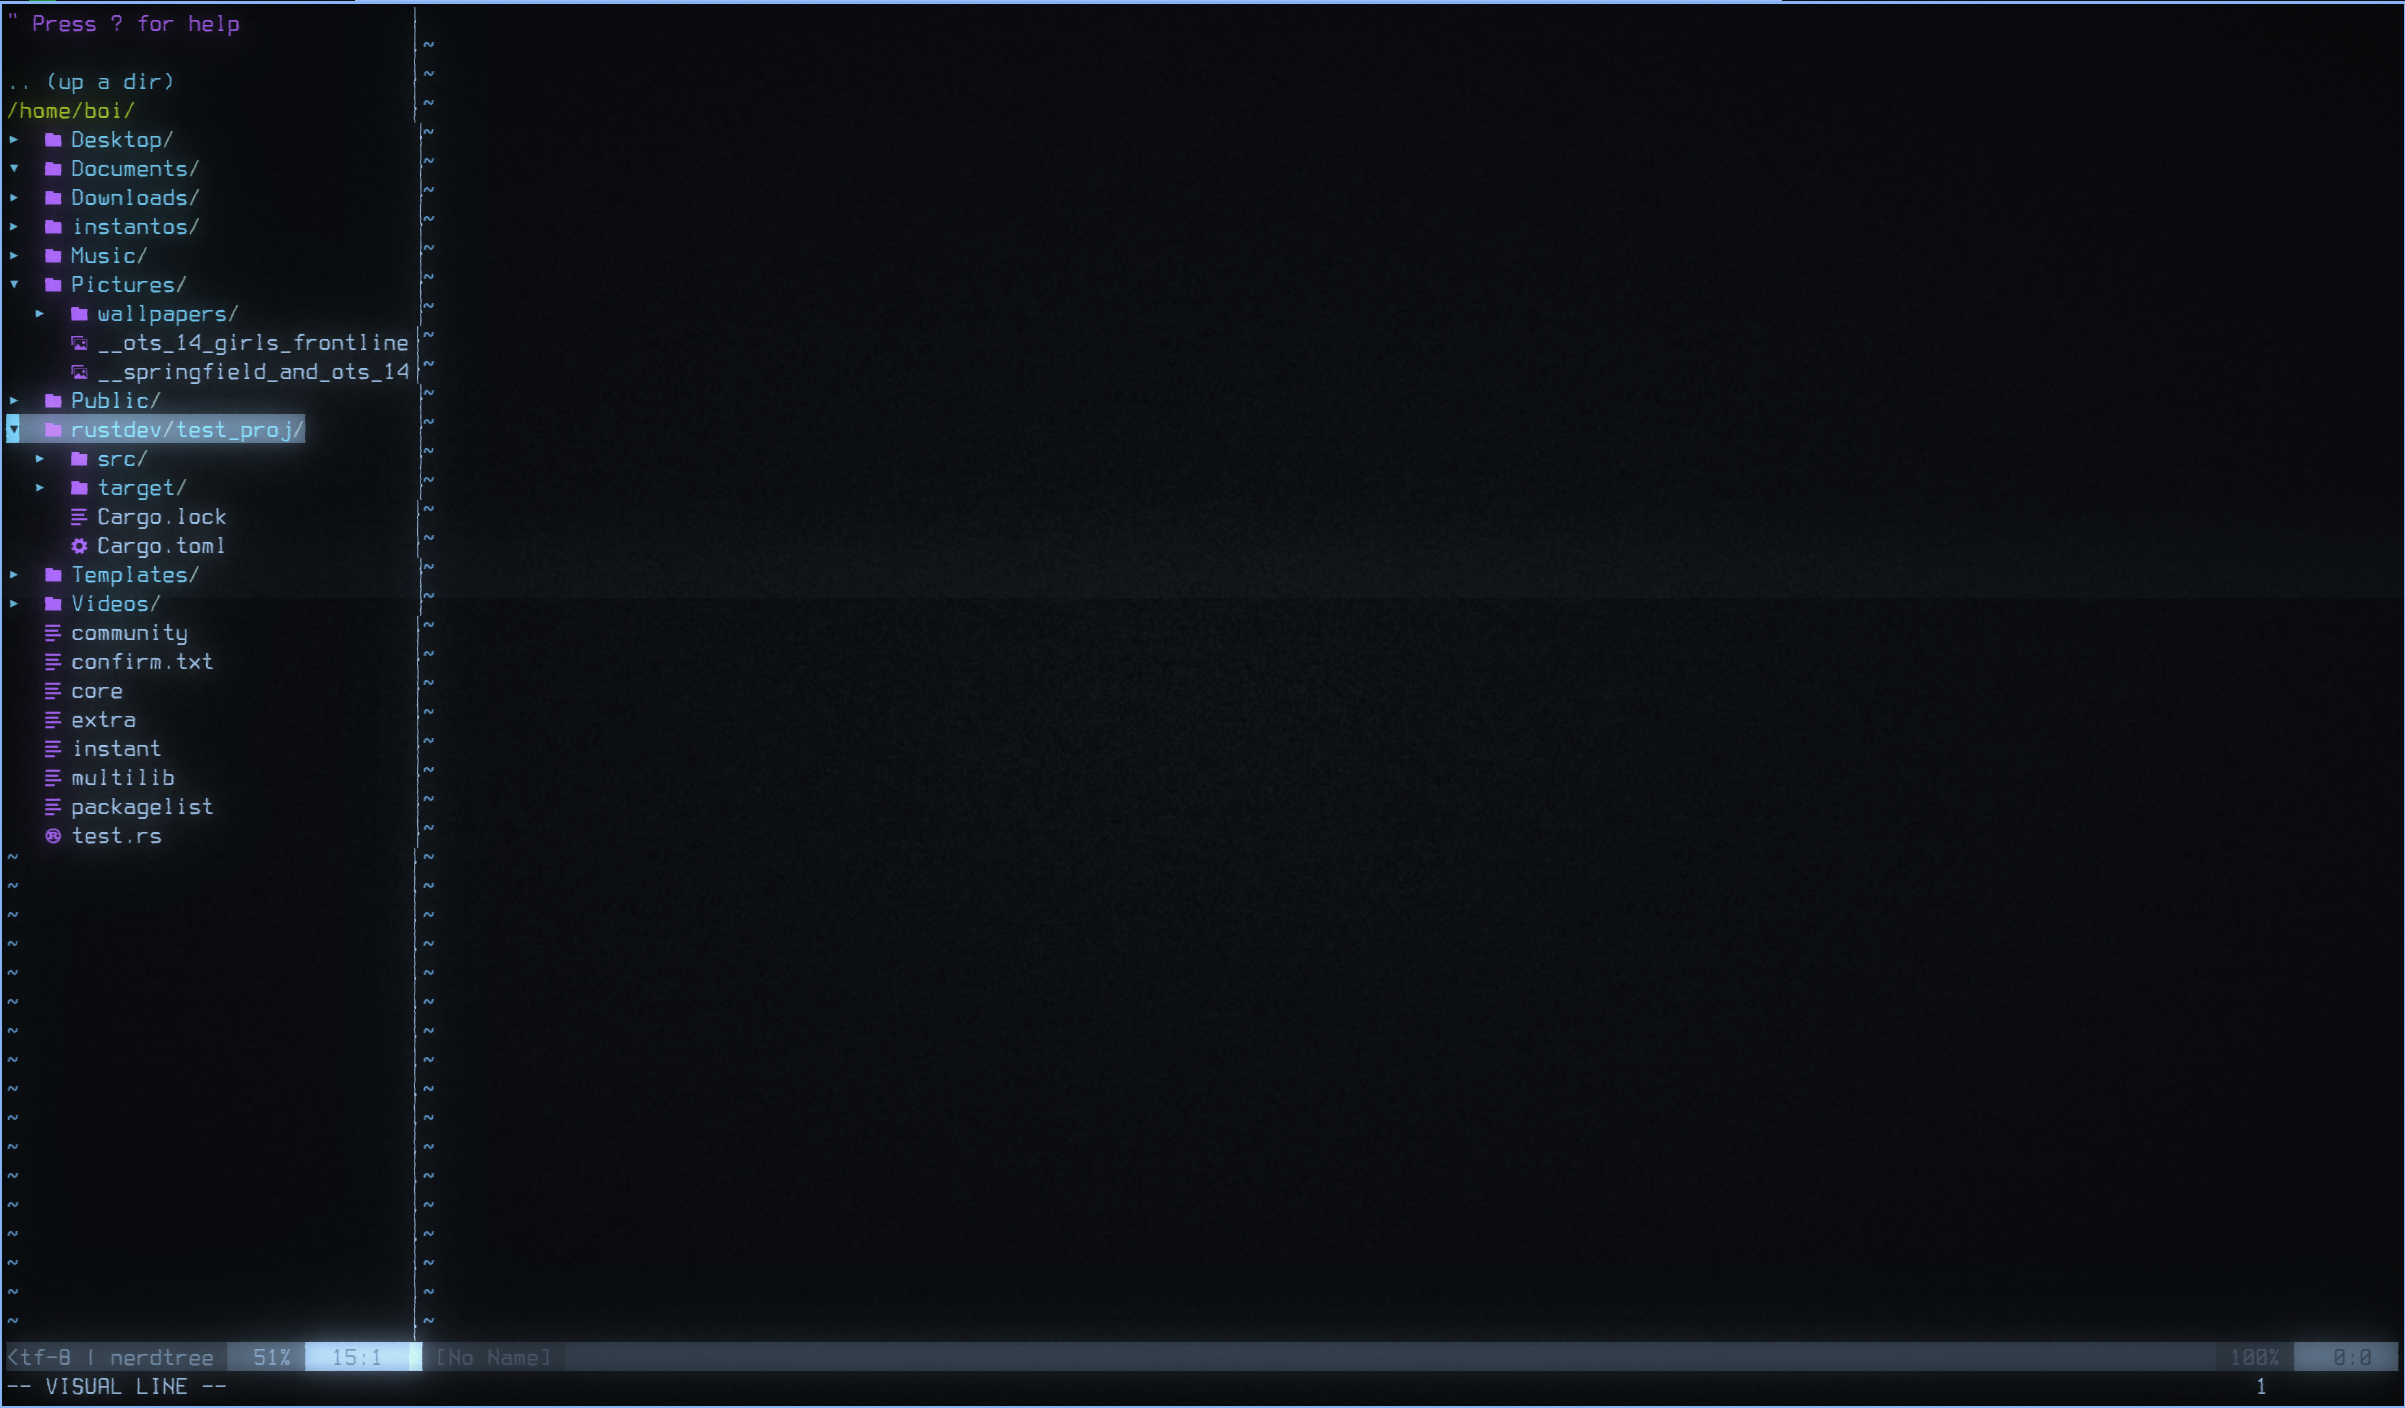
now we have plugin managers that not only separate plugins into their own folders for easier management, many now allow you to define the plugins you want inside your .vimrc/init.vim and have them download and install from within vim. You can see below that I already have a few plugins downloaded via vim-plug all with their own folders and all I have to do is have them listed in my init.vim and run the :pluginstall command.
There are of course other plugin managers out there that you can use if you wish however vim-plug has the advantage of being stupid easy to install and use once you get used to the config diving.
Okay but how do you install vim-plug?
First things first, head over to Vim-plug’s Github page, I’ll still go over the directions here but they really are stupid simple. Find the section for whichever version of Vim your going to be installing this all to and run the relevant terminal command. For Neovim you just need to be aware of whether you installed it via flatpak or you standard package manager and choose the appropriate method.
for our example here we would use this one:
sh -c 'curl -fLo "${XDG_DATA_HOME:-$HOME/.local/share}"/nvim/site/autoload/plug.vim --create-dirs \
       https://raw.githubusercontent.com/junegunn/vim-plug/master/plug.vim'
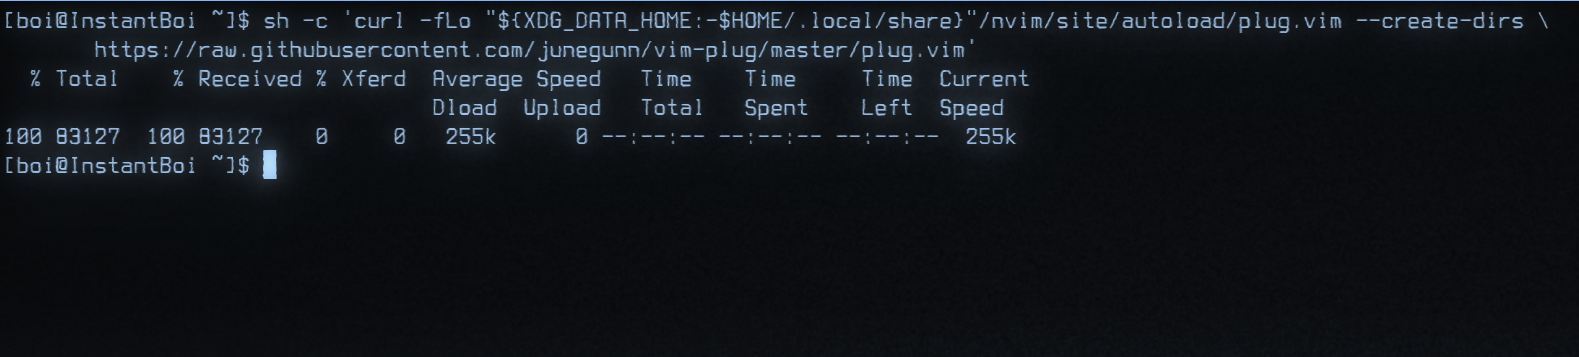
this command simply pulls the vim.plug file from the git repo, creates the relevant directories and places the file inside there. If you start neovim now and try to use the :PlugStatus command it wont work. Don’t Panic, Vim-plug doesnt actually start until a section is added to the init file that will trigger it to run.

You might be wondering why if I had plugins already downloaded why mine didn’t work. For some reason my init file got over written at some point meaning I have lost the section that defines my plugins and tells vim-plug to initialize. Perfect opportunity to write a blog post about this process 😉
It should also be noted that by default the colon commands like that are (like the normal Linux system) case sensitive. If you get the config file set up and you still can’t run the plug commands (or see them in the TAB auto complete) make sure you have them properly capitalized. Don’t be an idiot like I was forgetting that and then thinking that it’s somehow broken when you just need to pay attention to your spelling.
Setting up the config file
Next up we need to create our init file (or the ~/.vimrc for standard vim)
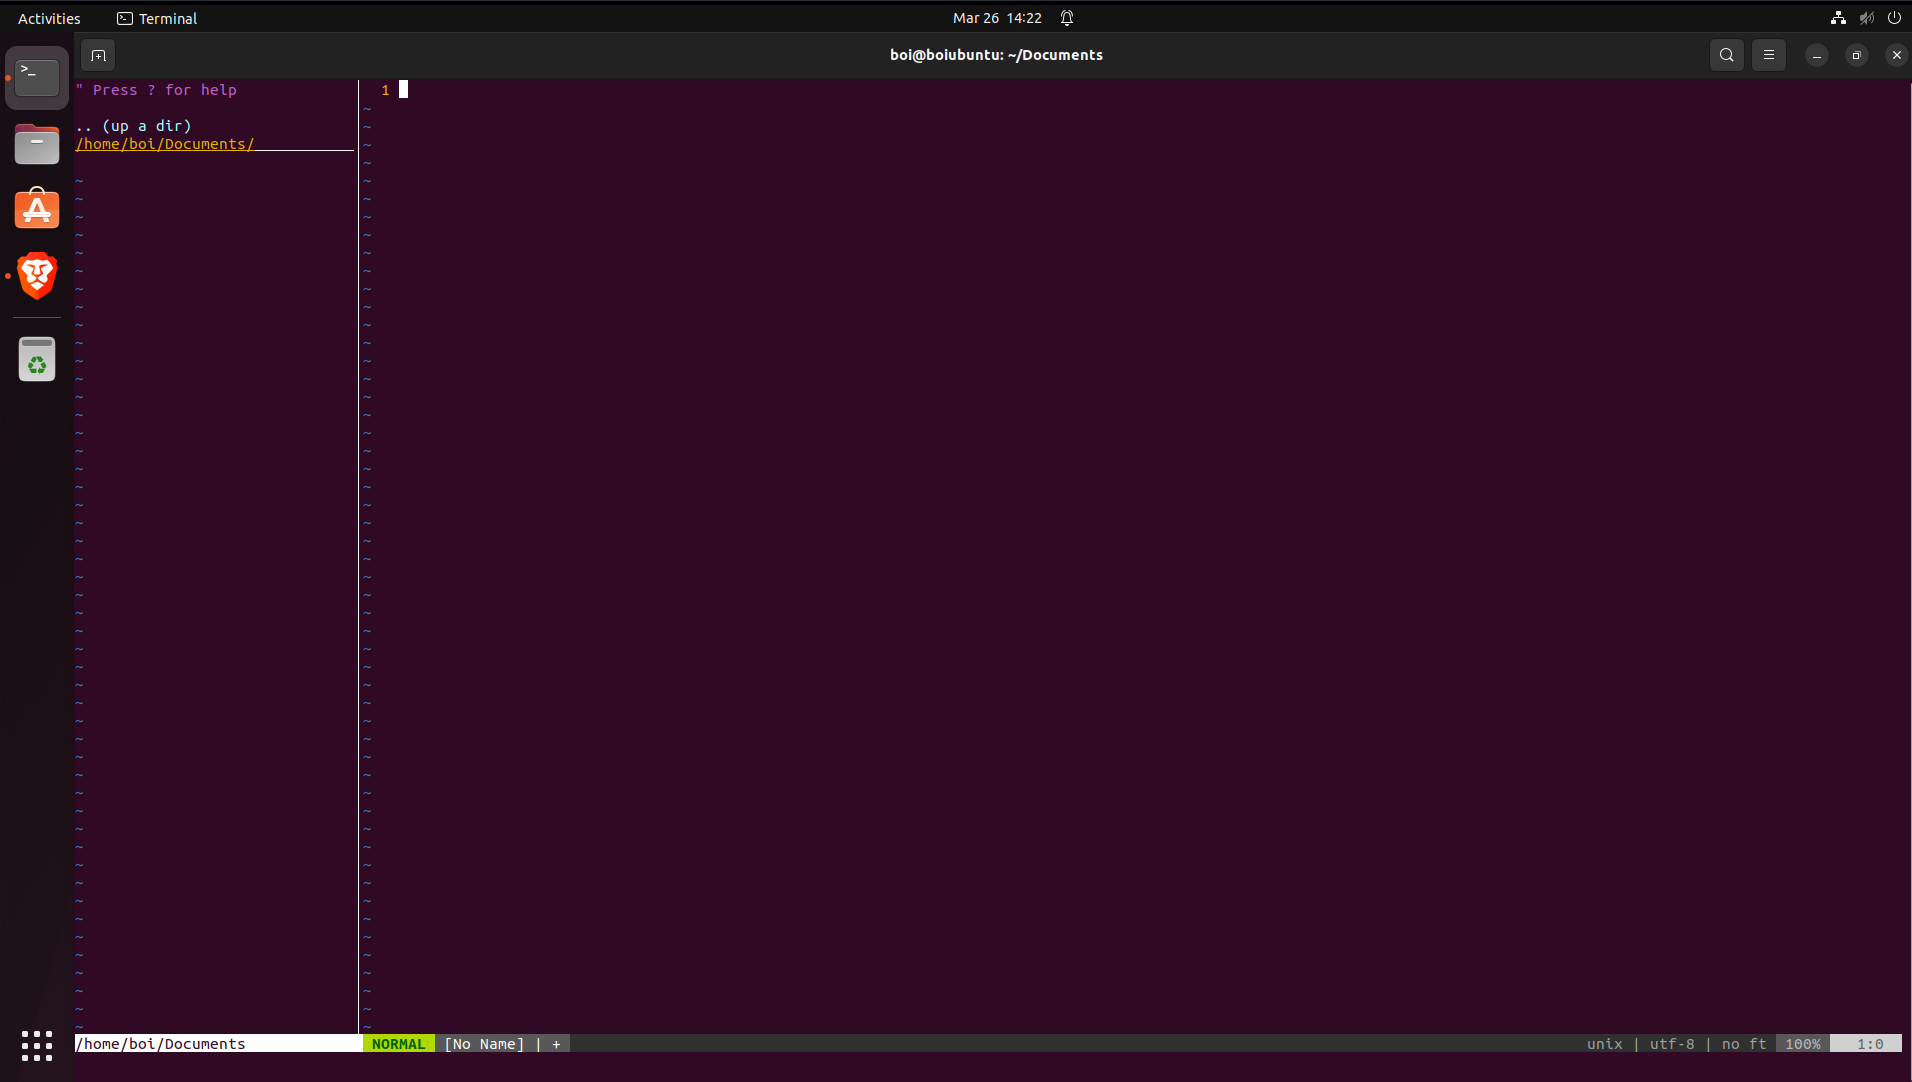
Typically the neovim init file is located in ~/.config/nvim/init.vim however it is not installed with Neovim by default and isn’t required for the program to run in it’s normal capacity. As such we need to create it. At a blank terminal we need to create the directories for the init file.
mkdir ~/.config/nvimand then we can start creating the file by using:
nvim ~/.config/nvim/init.vimNow I said that vim-plug requires a certain block to call it to be initialized by Neovim and keeping in theme it’s rather simple (the double quotes mark comments in Vim script and won’t be read):
call plug#begin()
" plugins
" go
" in
" here
call plug#end()
the call plug#begin() is the beginning that actually tells neovim to load the plugin manager as well as telling Vim-plug where to install plugins to. What? you don’t see how it’s pointing to where it should download to? I don’t blame you just looking at this, documentation mentions you can add a path in between the () to tell it where you want to download plugins to, otherwise it goes to the default directory of ~/.local/share/nvim/plugged which is perfectly fine for most people and situations so we’ll stick with nothing in the parenthesis.
if you exit and start neovim again you should be able to run :PlugStatus or if you type :Pl (remembering the proper capitalization) and hit TAB you should see all the relevant Vim-plug commands.
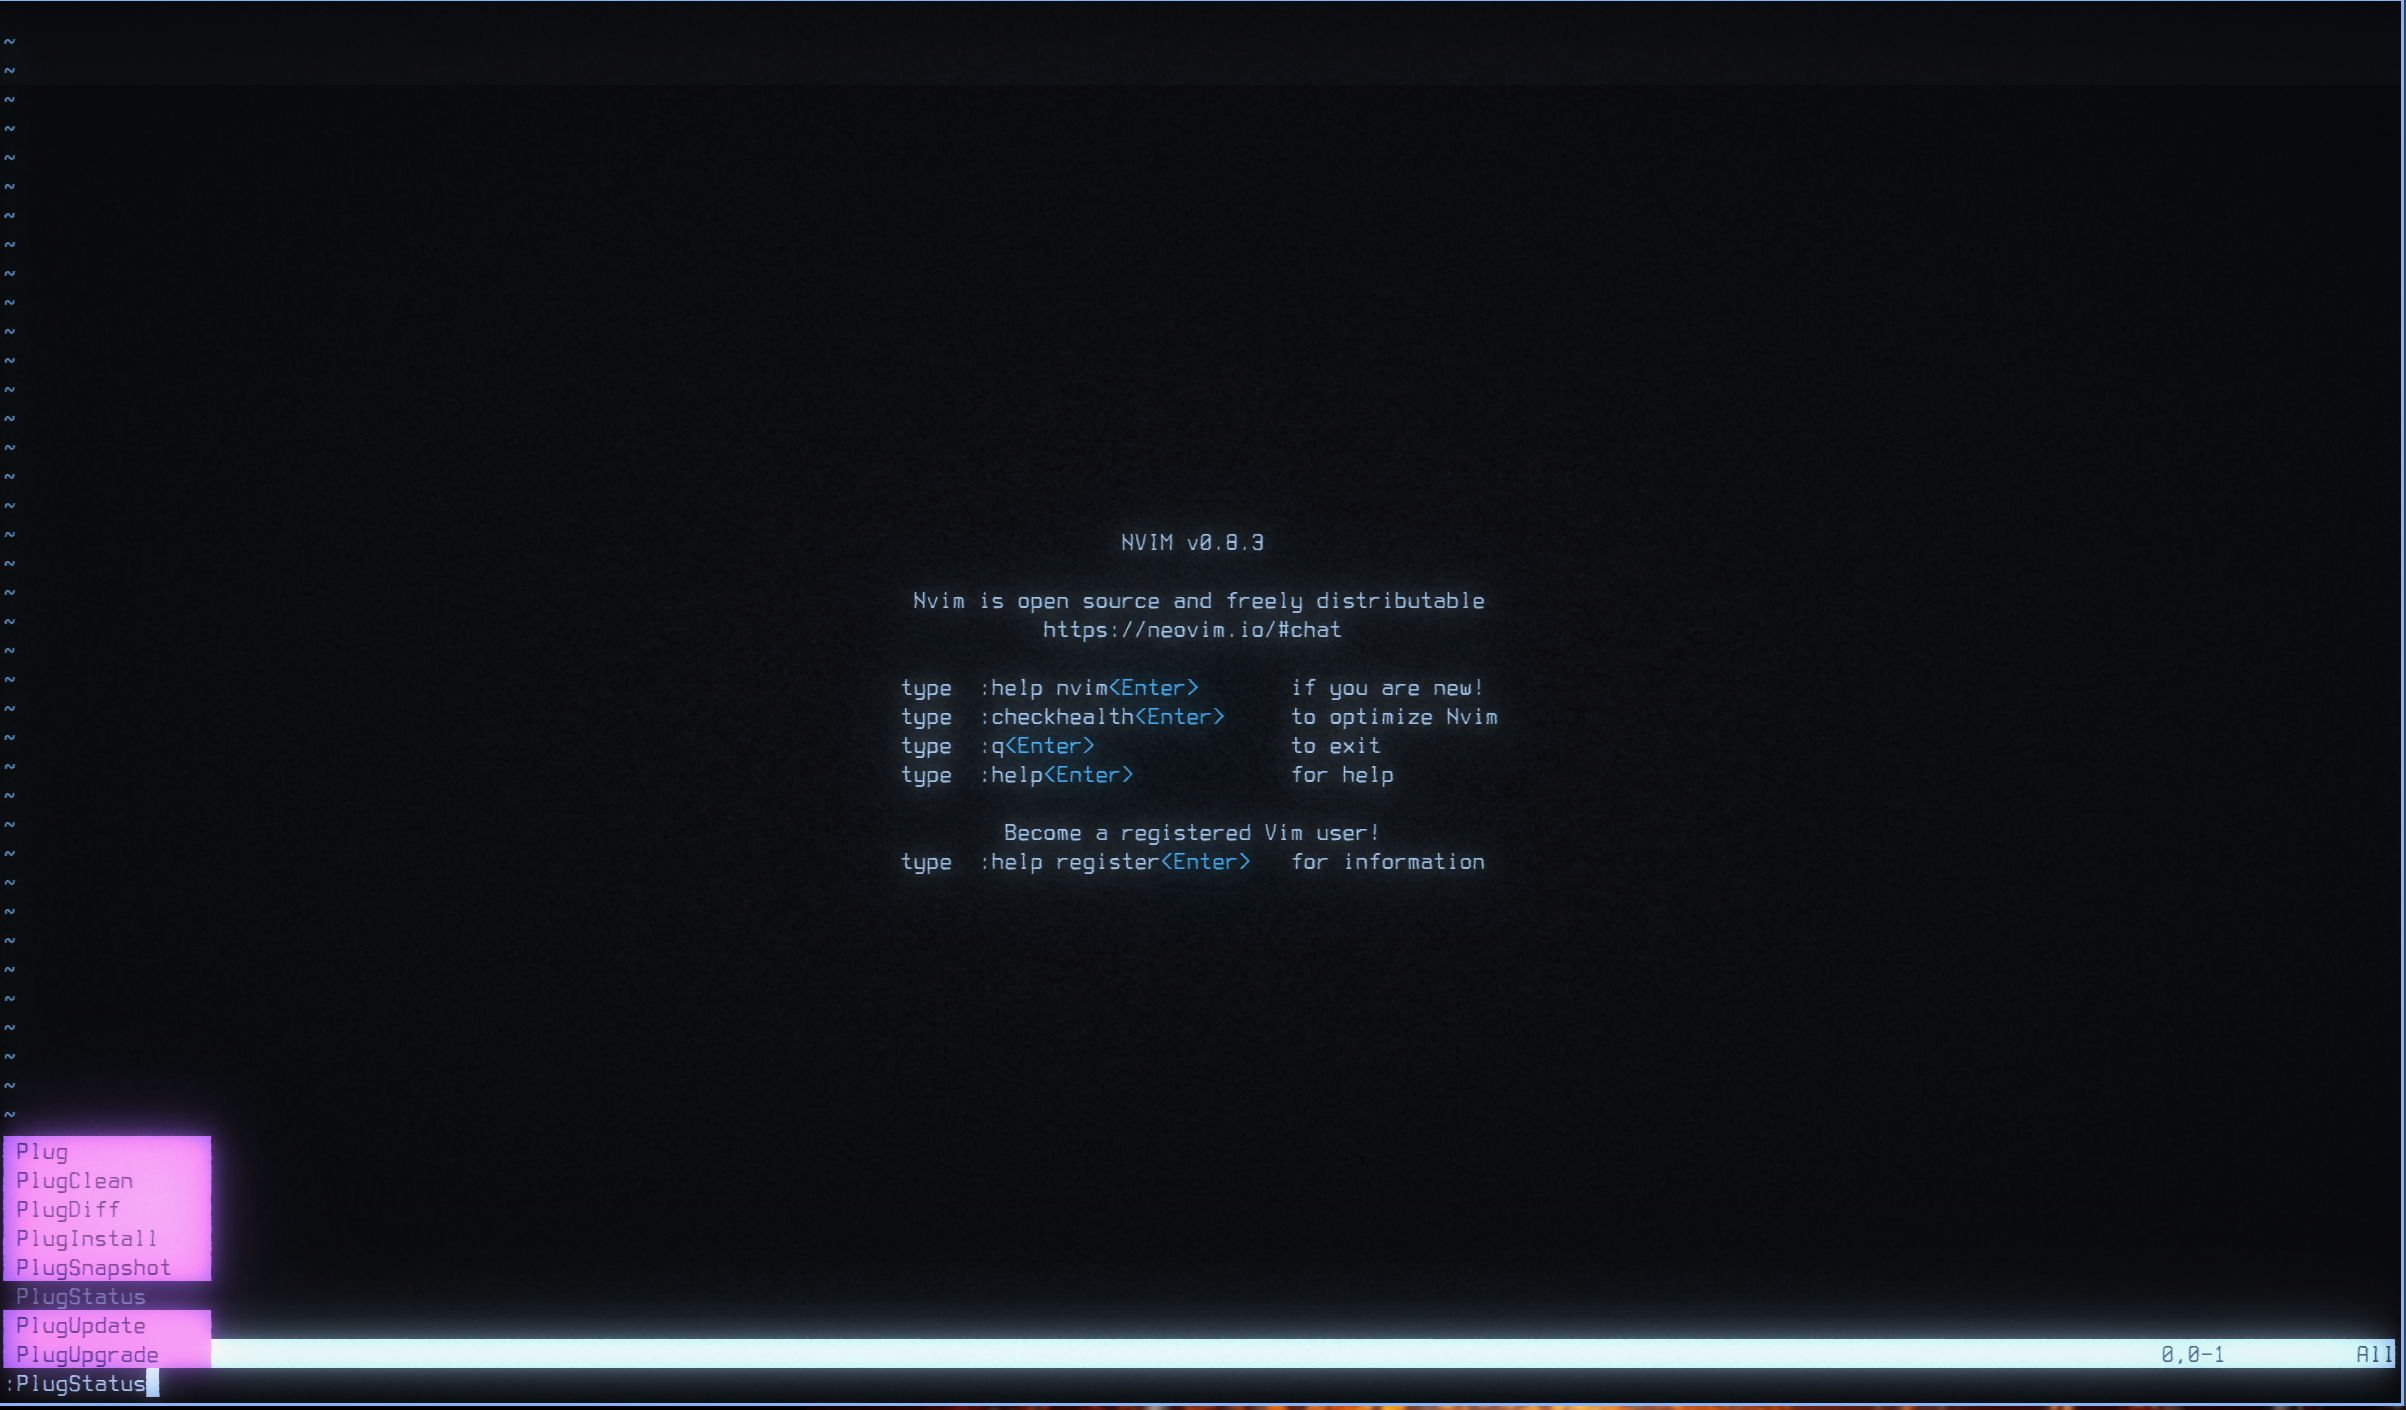
Running :PlugStatus will give you this since we don’t have any plugins defined yet:
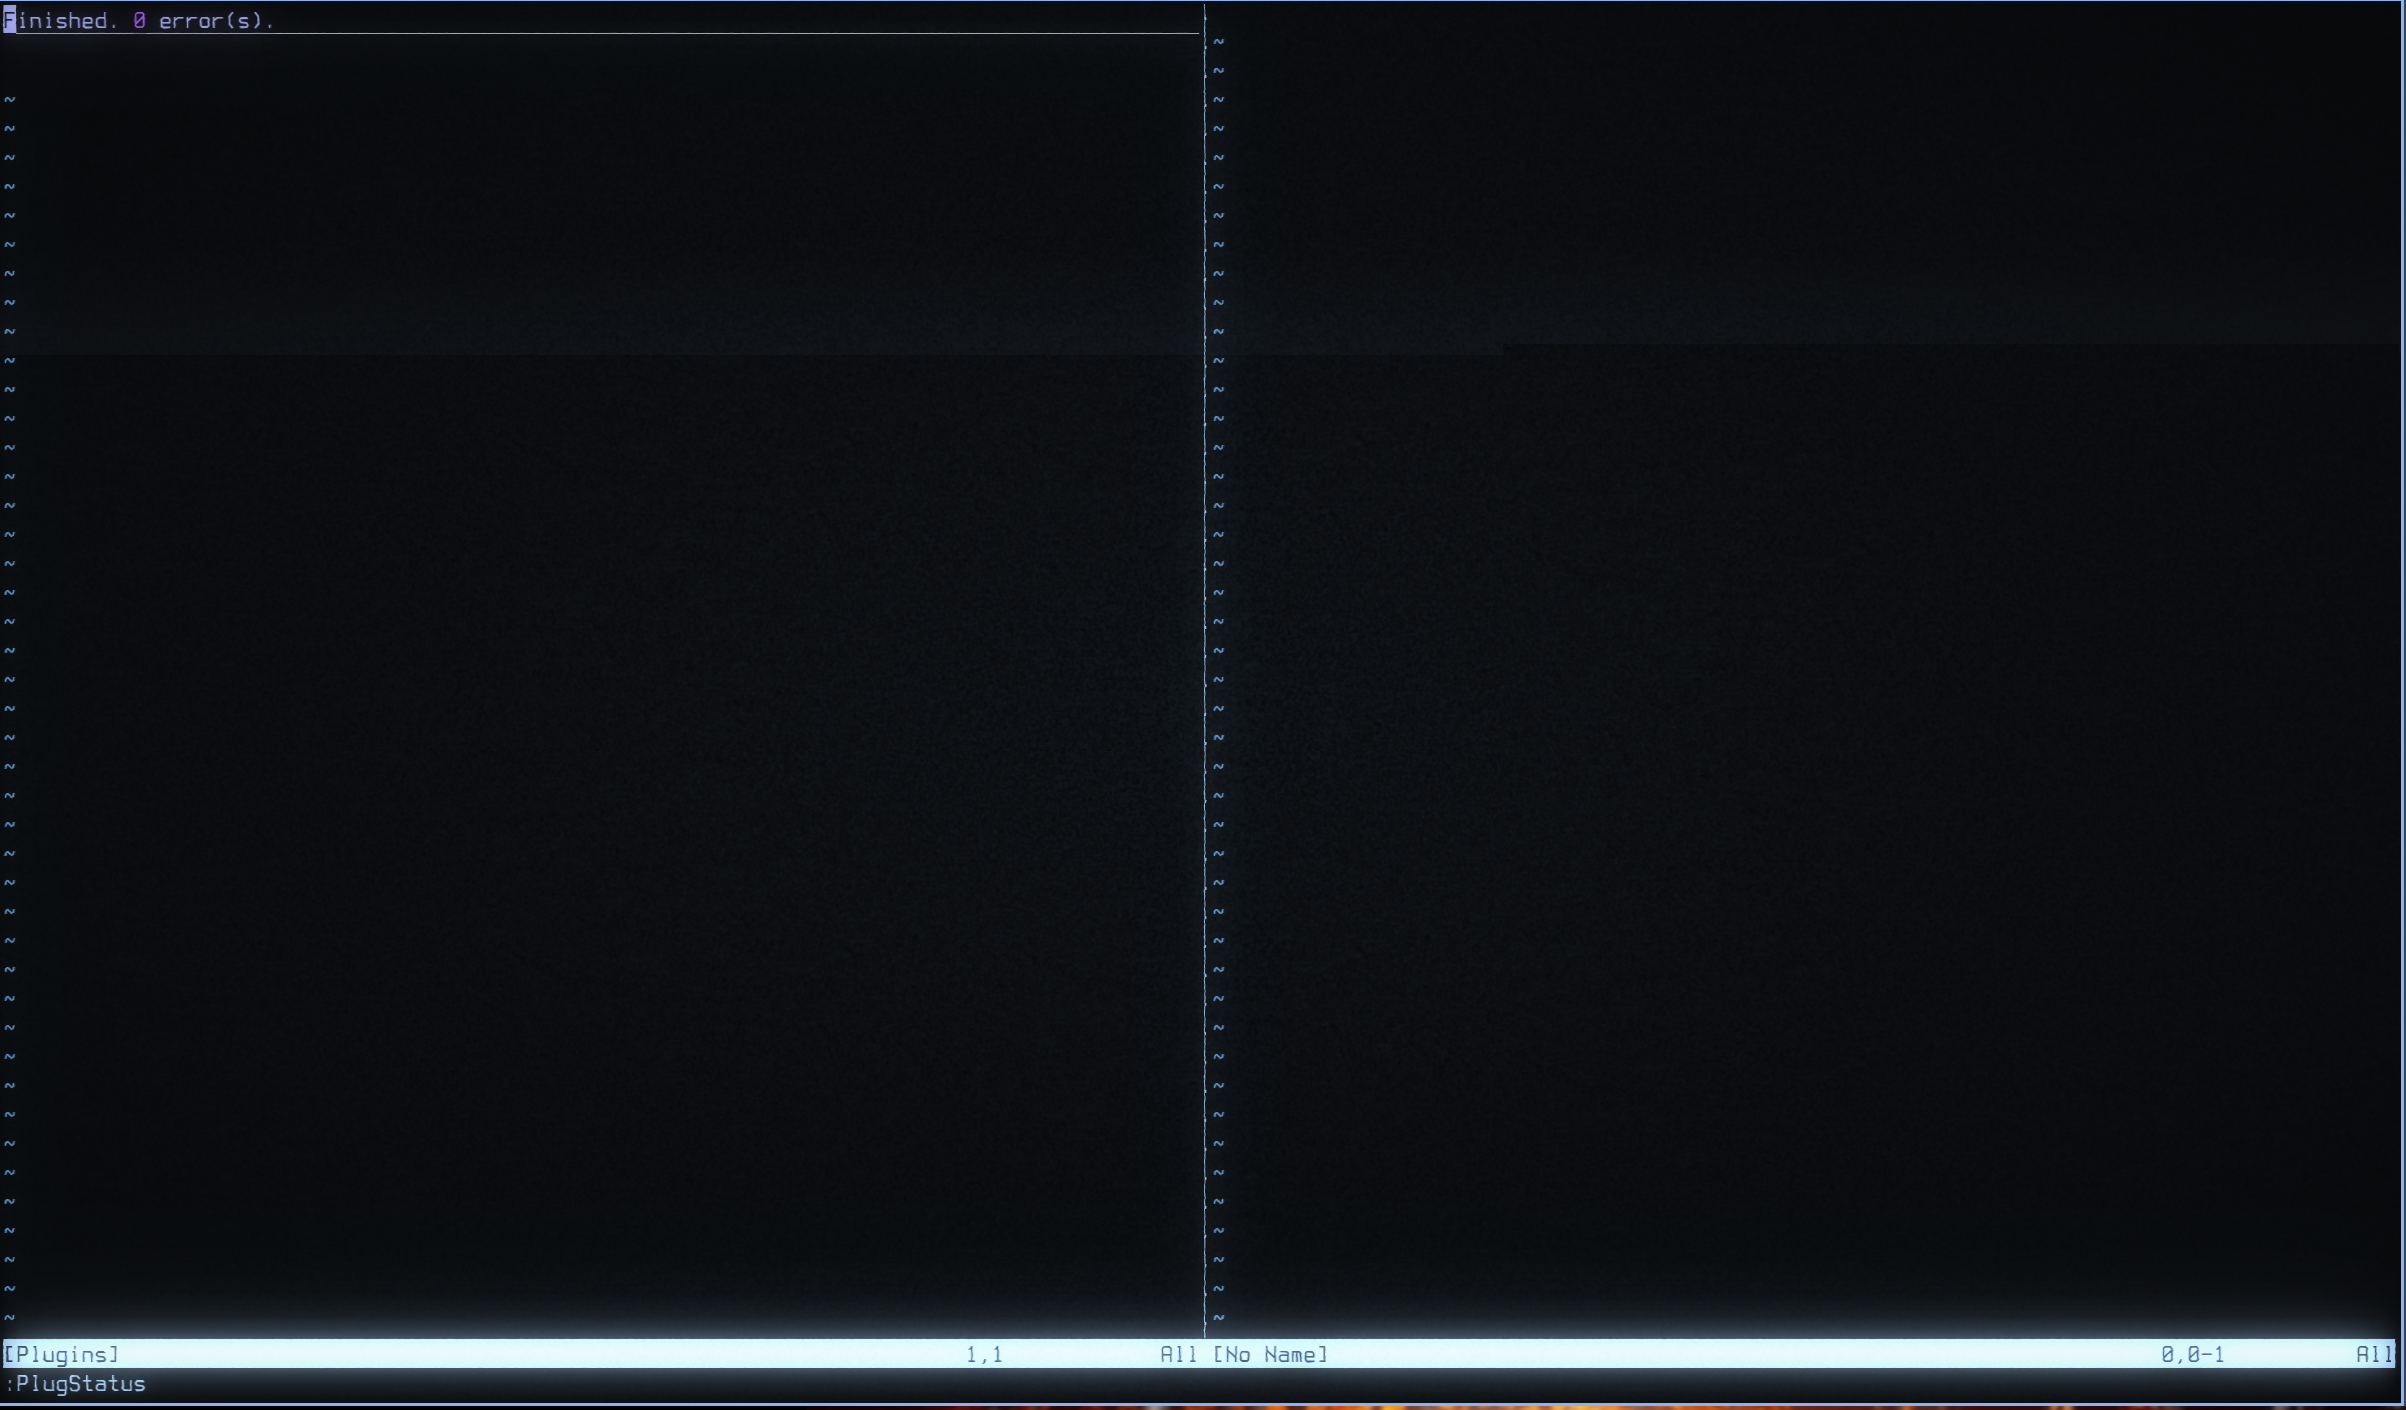
:q to close itAlright! now for the fun part: getting new plugins. To start off with I’m going to add one called Auto-Pairs which will add closing parenthesis, brackets and quotes automatically and leave our cursor in between them for easy typing.
To start open up your init.vim again and add this to the space between plug#begin() and plug#end() :
call plug#begin()
" Auto pairs
Plug 'Jiangmiao/auto-pairs'
call plug#end()
Now we save and exit and then re run Neovim and run :PlugStatus again and see the difference:
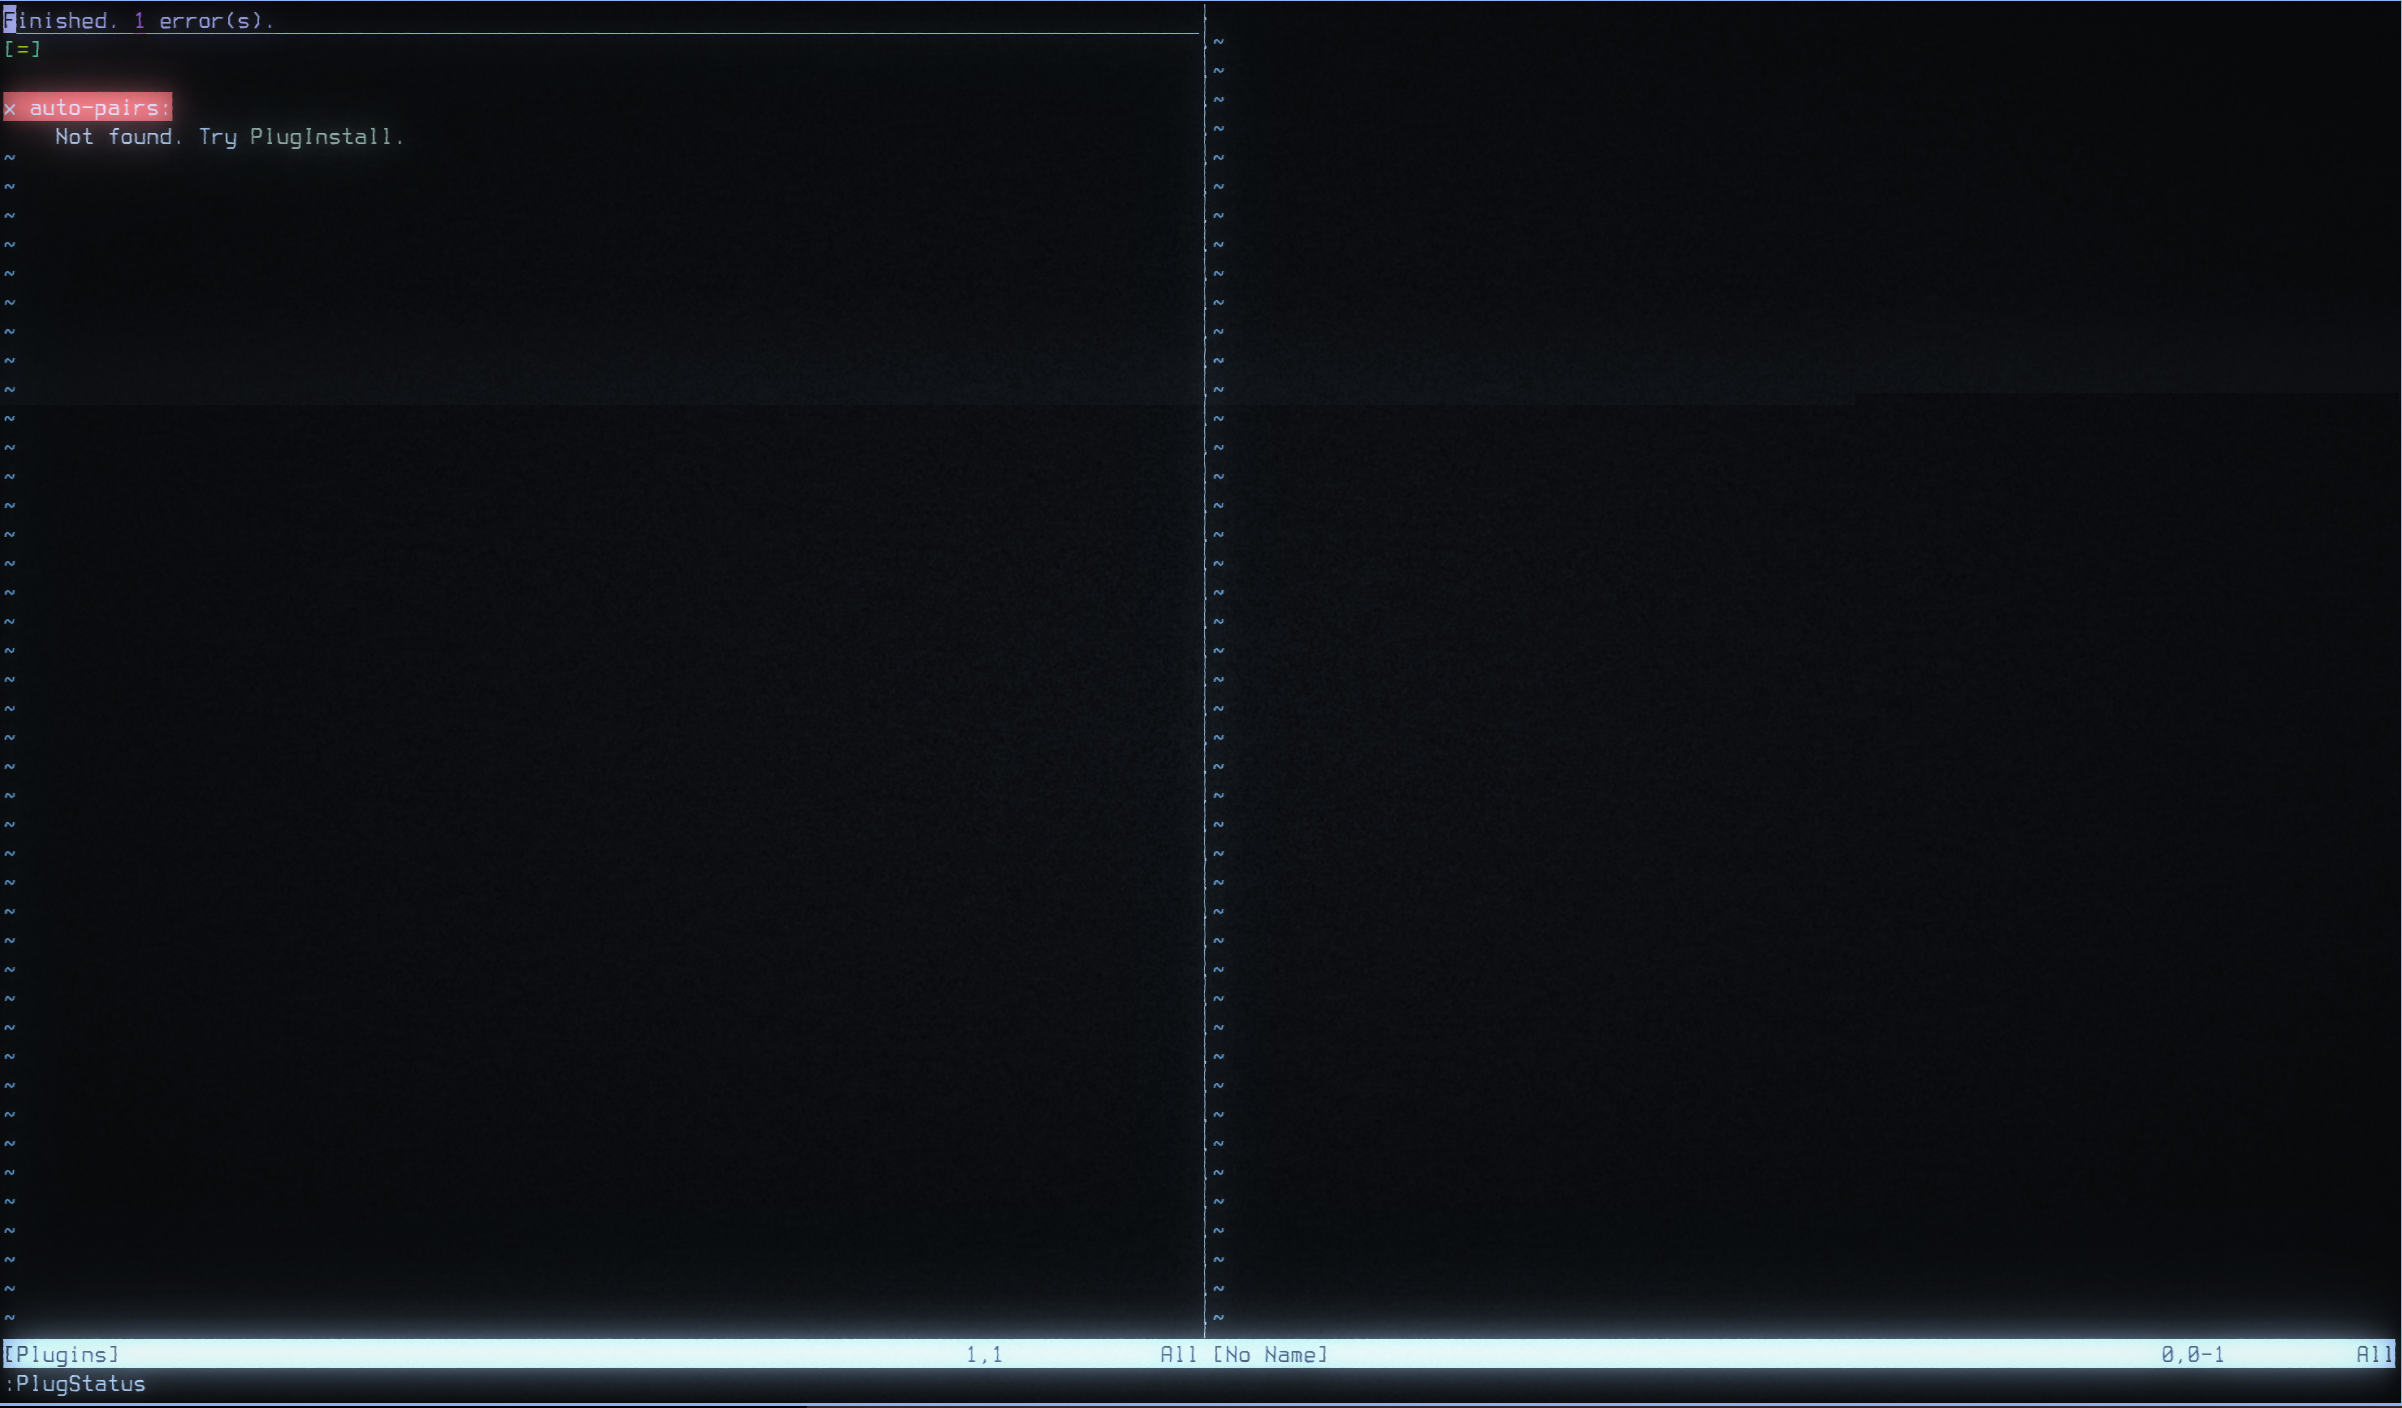
Now all we have to do as per the message from :PlugStatus is run :PlugInstall
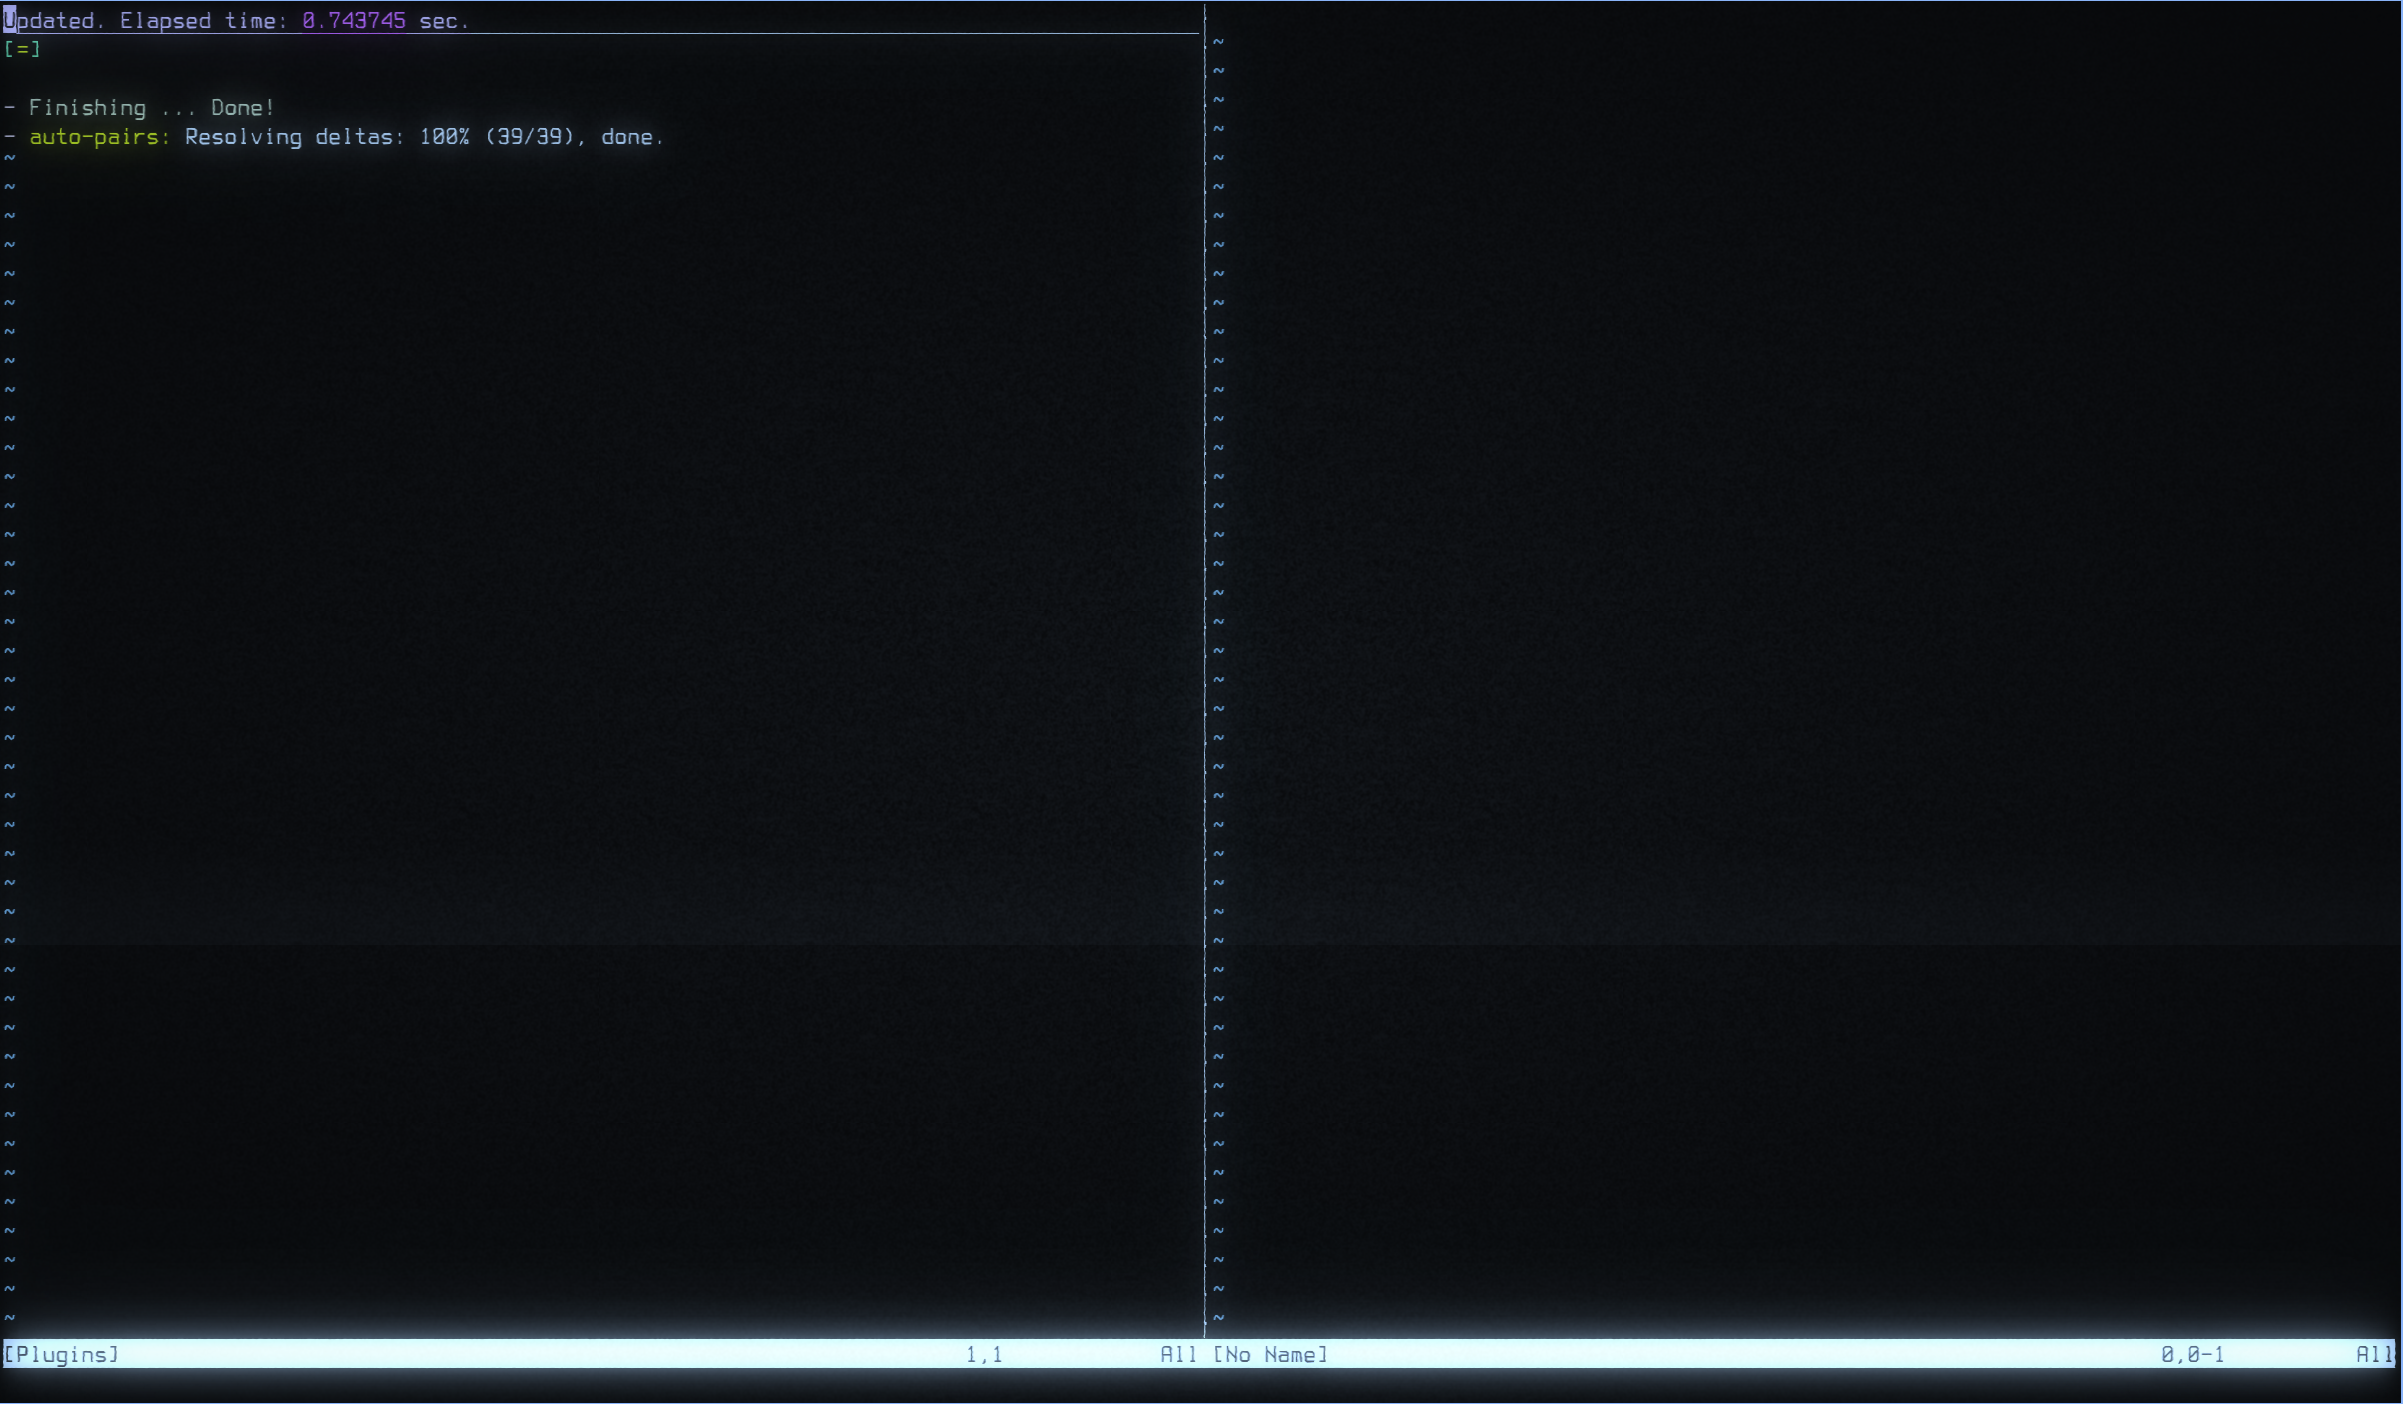
The plugin will be automatically downloaded and installed, ready to use to automatically
Now you may have noticed that format in the init file was kind of odd. Simply put the section in single quotes points vim-plug towards a user and then one of their repos to pull from.

This makes it really easy to add new plugins, although it should be noted that some plugins will have extra info they reccomend you use for instance Conquer of Completion recomends in their install guid to use:
Plug 'neoclide/coc.nvim', {'branch': 'release'}With an additional variation if you want to tell it to download and build the project on install rahter than using the (recommended) pre-compiled version
" Or build from source code by using yarn: https://yarnpkg.com
Plug 'neoclide/coc.nvim', {'branch': 'master', 'do': 'yarn install --frozen-lockfile'}
make sure to check for installation instructions on each plugin but if they don’t have any for vim-plug you may just use the previous method of pointing it via the ‘user/repo’ syntax
Finishing out our plugins list
For this next section I’m going to quickly add a few more plugins, specifically:
The config file as of should look something like this:

After which we exit, re enter nvim and run :PlugStatus and :PlugInstall to install our new toys.
Once installed we can run :NERDTreeToggle to activate the file browser on the left side, we can also see the status line donw at the bottom looks a bit nicer and the file browser even has icons for what things are in the file system as well as being mouse navigable.
The final thing I’m going to add is a bit different, coc has plugins of it’s own managed by itself rather than something like vim-plug. In this case I’m going to add coc-rust-analyzer which if you check the install instructions is installed inside vim using:
:CocInstall coc-rust-analyzerThe rust analyzer plugin will take some other conditions to show off but they are fairly simple if you have rust installed however if you go into insert mode and begin a shebang line like you would for a BASH script you can see coc providing so suggestions for the path to /bin/bash

However if you try and hit TAB or ENTER you may notice they act simply as they would in a normal word processor meaning you can’t actually use the auto-complete features. As well if you exit and re enter you will notice that NERDTree is gone again and requires that you run the toggle command again, let alone the fact that when you quit you have to quit at least twice: once for the main view and another for NERDTree. Needless to say we have a few more things to tweak before we call this good.
First up: mapping our new controls, with a small side-track
Mapping controls
So, about that autocomplete feature…
Simply put just because we installed it doesn’t mean it’s really ready to go just yet. Coc requires buttons to actually let you cycle through the suggestions as well as preferably one to select the option you want to fill in. First off though lets side-track and alleviate something with those colon commands: capitalization.
set ignorecase
set smartcase
These two options added to your init file will make it so when you begin typing a colon command if you type in lowercase it will be case insensitive for both running and searching commands however if you have upper case letters in there it will assume you want a case sensitive search. Go ahead and add that into your init.vim anywhere that’s not inside the plugin block, save and exit and re-launch nvim, then try just typing : followed by anything and hit TAB. You should see things pop up regardless of the capitalization (try :pl or :ner to see stuff related to our plugins).
Now that we have that convenience feature out of the way, we’re going to actually map some keys for coc auto completion to really work. We can grab a few snippets straight out of the main page for coc particularly using TAB to cycle the list of suggestions and ENTER to auto complete the selected option. It’s up to you whether you want to use these particular bindings as there are a few examples provided in coc’s documentation but my init bow looks like this:
You may have noticed I also added (commandeered from somewhere on the internet) a section that lets me use ALT+arrow keys to move between windows inside Neovim, this will com in later but for now if you start a file with #! /bin/ba you should be able to use TAB to cycle down the list and SHIFT+TAB to cycle up the list as well as ENTER to select the current option and fill it in. It is worth noting that using TAB in insert mode now will spit errors unfortunately do you will have to resort to using multiple spaces (if anyone smarter than me knows how to get around this let me know)
Next up we’re gonna to about making NERDTree a bit more usable and a couple other minor tweaks…
Additional configurations
You probably noticed that starting Neovim now doesnt have NERDTree open by default but a read through it’s README shows a few useful snippets we can copy in to fix this and some other issues we may have. In particular:
NERDTree at startup with the cursor in the other window
" Start NERDTree and put the cursor back in the other window.
autocmd VimEnter * NERDTree | wincmd p
Close the tab if NERDTree is the only window left open in it
" Close the tab if NERDTree is the only window remaining in it.
autocmd BufEnter * if winnr('$') == 1 && exists('b:NERDTree') && b:NERDTree.isTabTree() | quit | endif
Open NERDTree in newly spawned tabs
" Open the existing NERDTree on each new tab.
autocmd BufWinEnter * if getcmdwintype() == '' | silent NERDTreeMirror | endif
Finally, I want to be able to see hidden files and folders in NERDTree so I will also add:
let NERDTreeShowHidden=1I am also going to add to my normal vim options section:
set numberWhich will add numbers to the side of the document making it easier to locate which line is which at a glance, (useful for debugging and tracking down errors)
As well I’m going to add this small snippet that will set some rules about code folding:
setlocal foldmethod=indent
set foldlevel=99
Here is the bit earlier to make : commands case insensitive when all lower case and case sensitive when upper case letters are present
set ignorecase
set smartcase
Additionally take the time to mark out the sections of your config file with comments
making use of these new features
Lets quickly go over some useful keybinds that should already be present as well as that arrow key bit as well.
| za | open fold under cursor |
| zA | close fold under cursor |
| t or T | inside of NERDTree these will open the selected file in another tab, lowercase will open and switch to that tab automatically while uppercase will open the tab in the background |
| I | inside of NERDTree this will toggle whether to show hidden files or not, use this if you prefer not to set show hidden to on by default |
| ENTER or double clicking | inside of NERDTree this will open and close folders and open files to the current window |
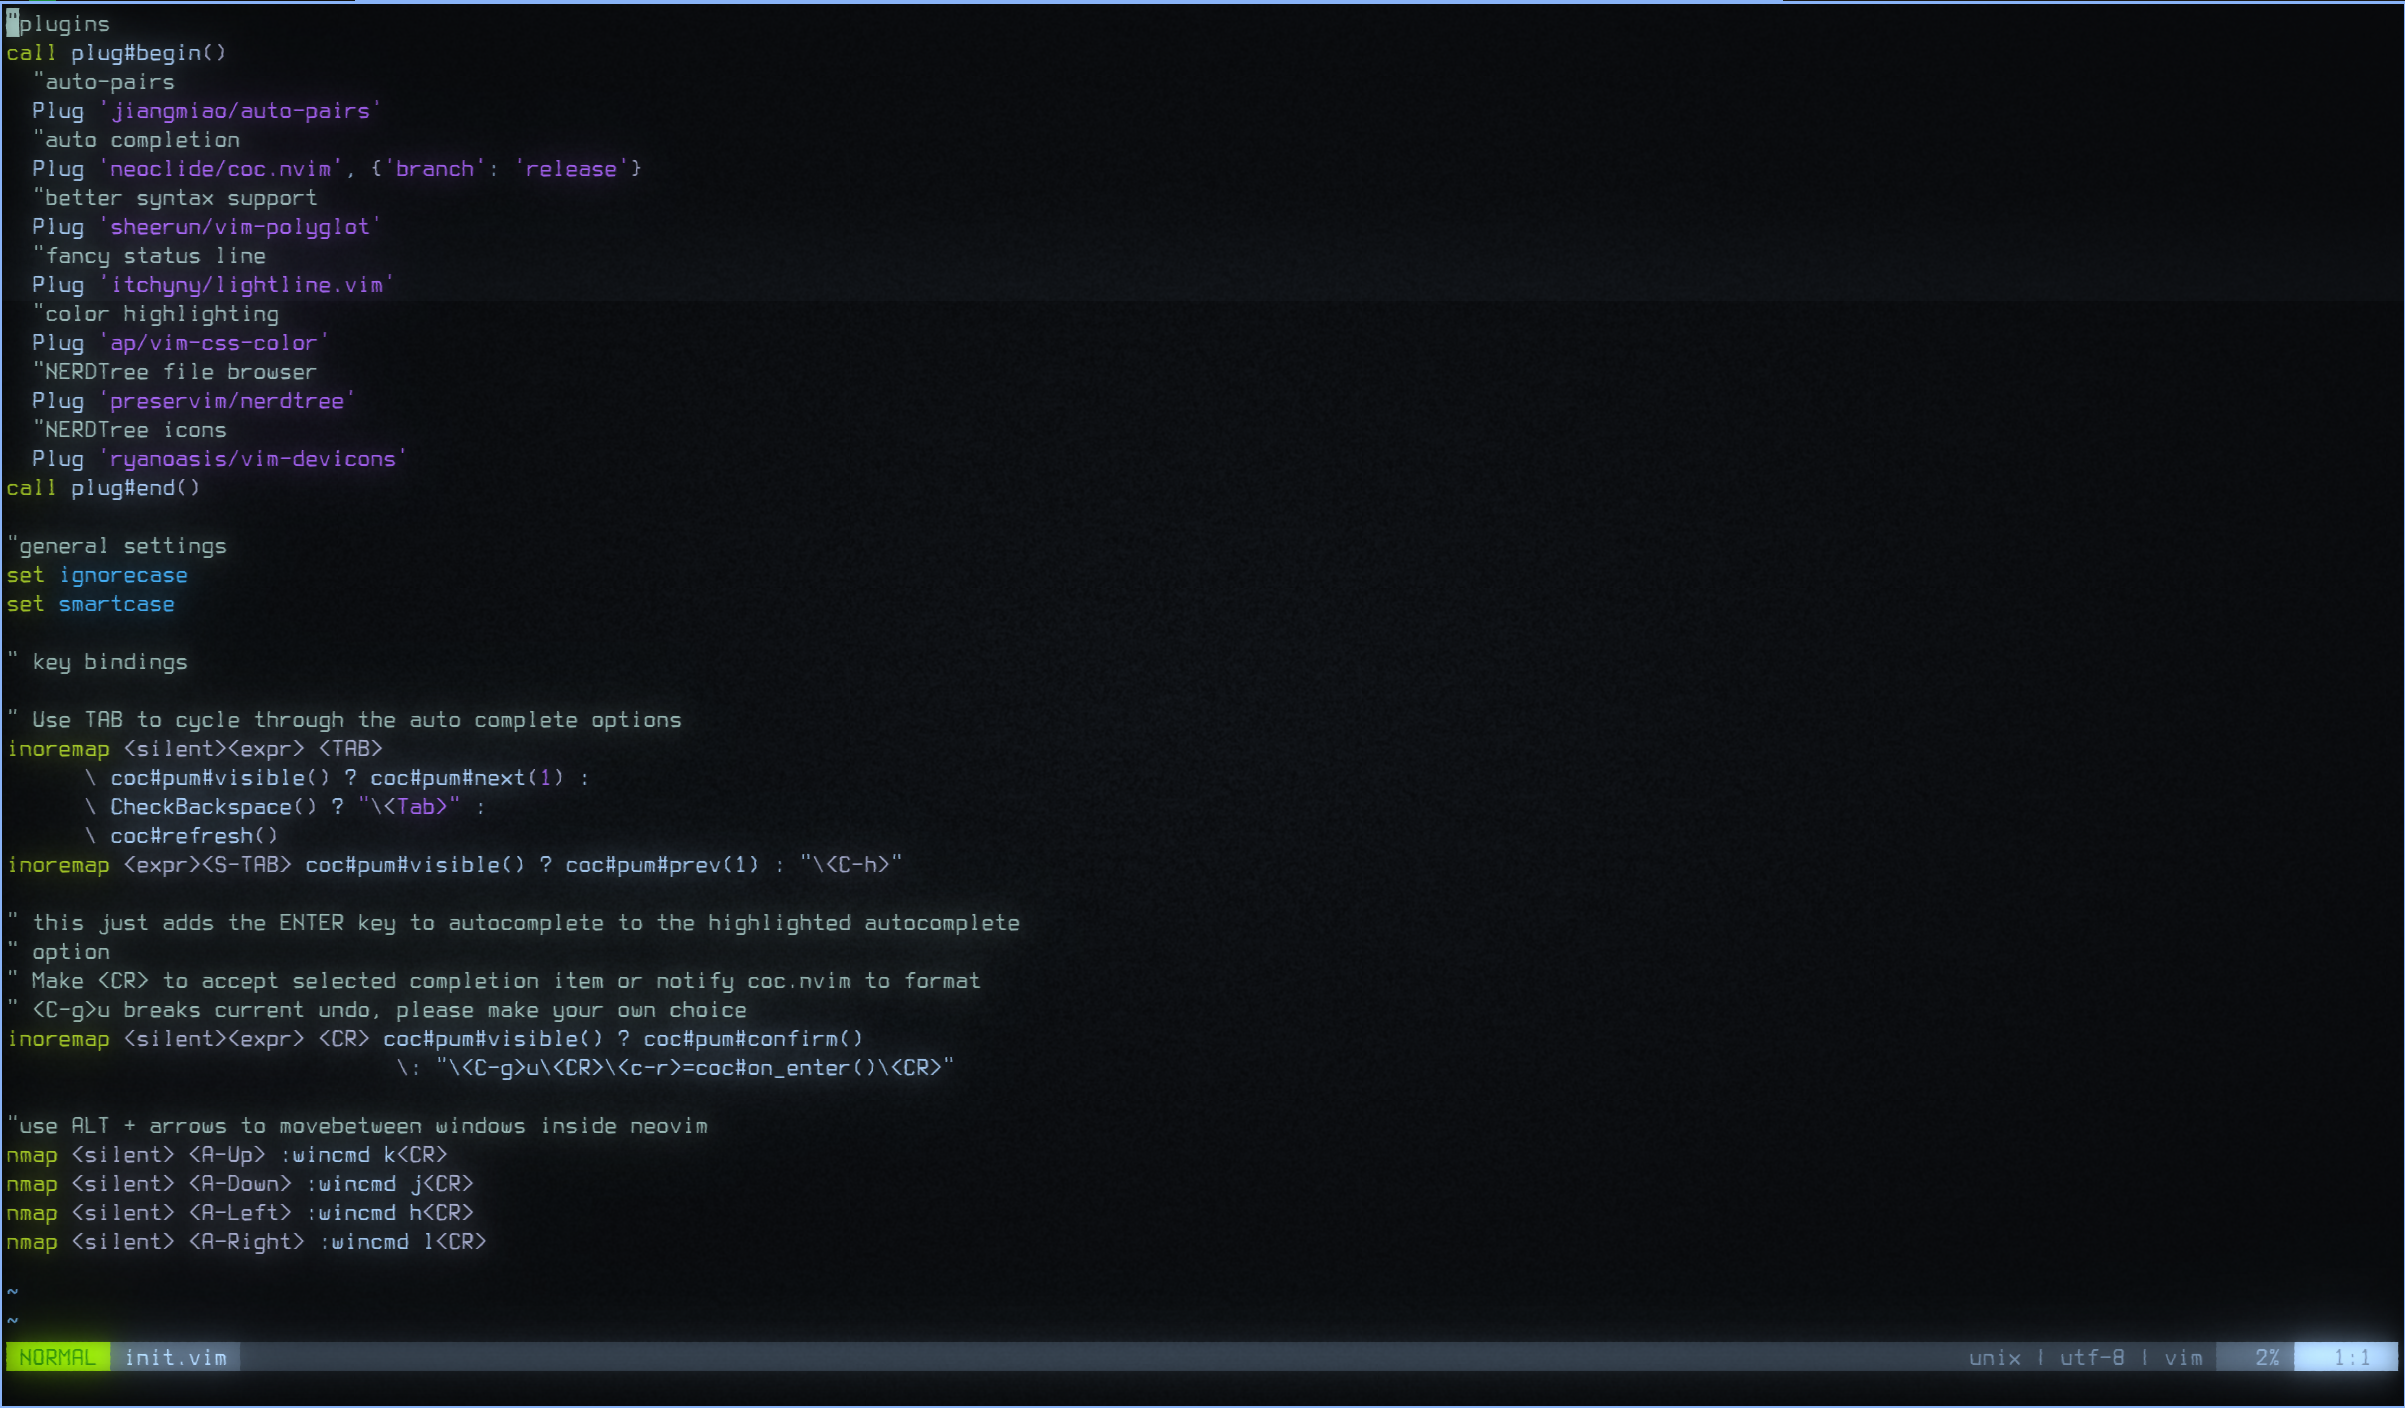
the completed config file for reference
"plugins
call plug#begin()
	"auto-pairs
	Plug 'jiangmiao/auto-pairs'
	"auto completion
	Plug 'neoclide/coc.nvim', {'branch': 'release'}
	"better syntax support
	Plug 'sheerun/vim-polyglot'
	"fancy status line
	Plug 'itchyny/lightline.vim'
	"color highlighting
	Plug 'ap/vim-css-color'
	"NERDTree file browser
	Plug 'preservim/nerdtree'
	"NERDTree icons
	Plug 'ryanoasis/vim-devicons'
call plug#end()

"general settings
set ignorecase
set smartcase
set number
setlocal foldmethod=indent
set foldlevel=99

" key bindings

" Use TAB to cycle through the auto complete options
inoremap <silent><expr> <TAB>
      \ coc#pum#visible() ? coc#pum#next(1) :
      \ CheckBackspace() ? "\<Tab>" :
      \ coc#refresh()
inoremap <expr><S-TAB> coc#pum#visible() ? coc#pum#prev(1) : "\<C-h>"

" this just adds the ENTER key to autocomplete to the highlighted autocomplete
" option
" Make <CR> to accept selected completion item or notify coc.nvim to format
" <C-g>u breaks current undo, please make your own choice
inoremap <silent><expr> <CR> coc#pum#visible() ? coc#pum#confirm()
                              \: "\<C-g>u\<CR>\<c-r>=coc#on_enter()\<CR>"

"use ALT + arrows to movebetween windows inside neovim
nmap <silent> <A-Up> :wincmd k<CR>
nmap <silent> <A-Down> :wincmd j<CR>
nmap <silent> <A-Left> :wincmd h<CR>
nmap <silent> <A-Right> :wincmd l<CR>

"NERDTree options

" Start NERDTree and put the cursor back in the other window.
autocmd VimEnter * NERDTree | wincmd p

" Close the tab if NERDTree is the only window remaining in it.
autocmd BufEnter * if winnr('$') == 1 && exists('b:NERDTree') && b:NERDTree.isTabTree() | quit | endif

" Open the existing NERDTree on each new tab.
autocmd BufWinEnter * if getcmdwintype() == '' | silent NERDTreeMirror | endif

let NERDTreeShowHidden=1